The world of custom apparel has undergone a massive transformation over the past decade. If you are looking to enter the personalized clothing market or scale an existing operation, you have likely encountered the term Direct to Garment Printer. This technology has revolutionized the way we create customized clothing, shifting the industry from bulk-only orders to a highly flexible, print on demand model. Get the Best information about dtg printer.
However, owning a Direct to Garment Printer is only half the battle. Achieving consistent, retail-quality prints requires a deep understanding of the machinery, the chemistry of the inks, the fabric types, and the necessary maintenance routines. In this comprehensive guide, we will explore the best practices for DTG printing success, taking you from the initial setup and fabric selection to advanced maintenance and troubleshooting.
1. Understanding Direct to Garment Technology
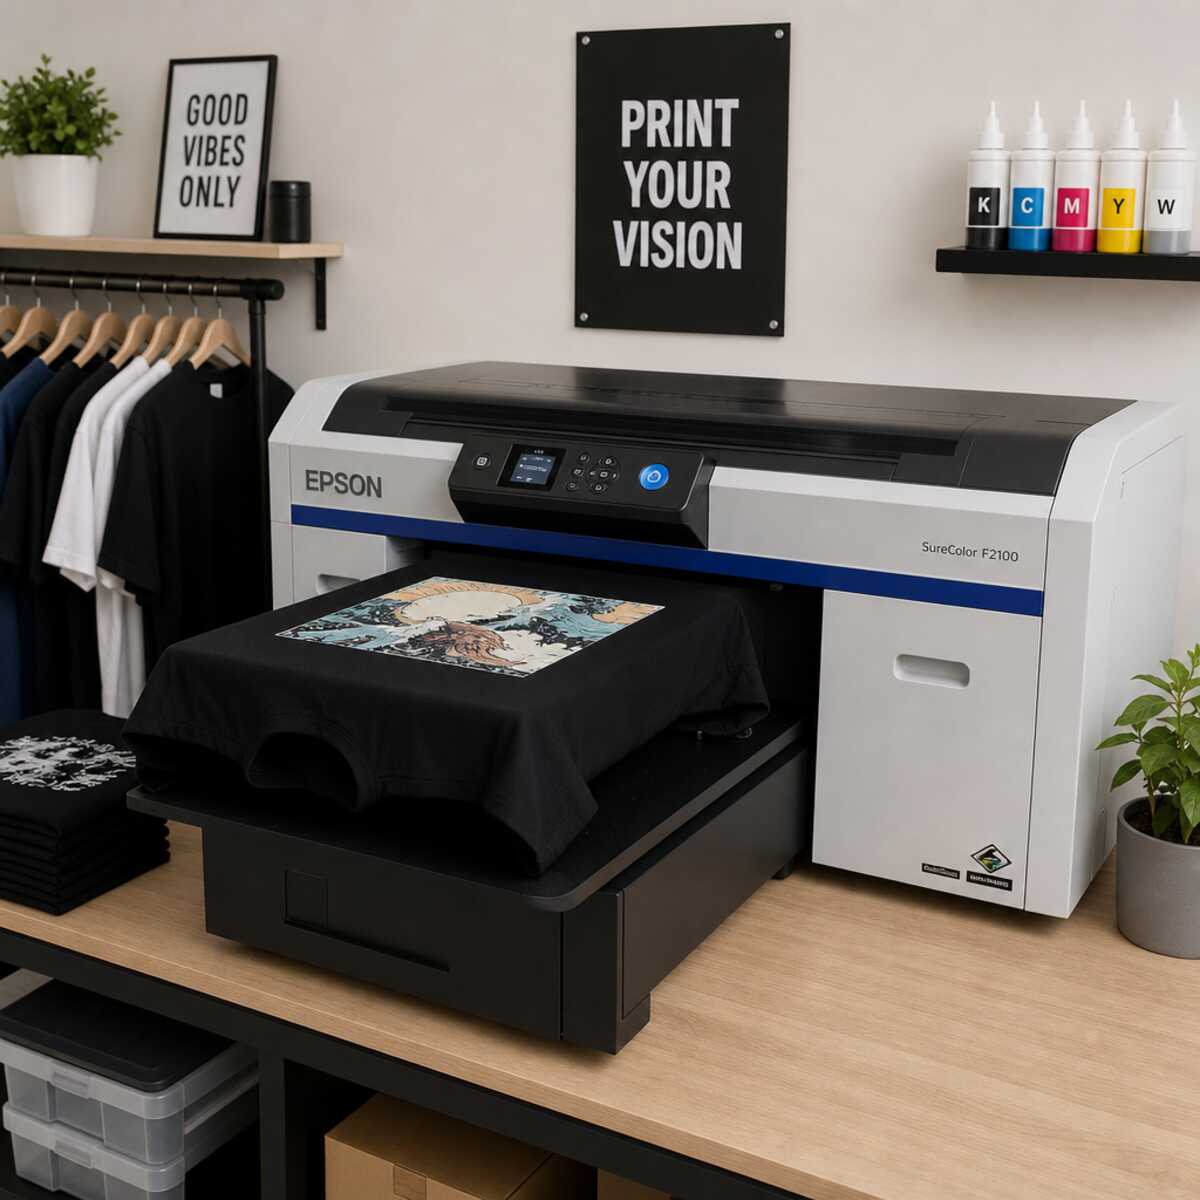
Before diving into best practices, it is crucial to understand how a Direct to Garment Printer actually works. Unlike traditional methods that require screens and stencils, DTG operates much like a standard desktop inkjet printer, but it is engineered specifically for apparel.
The Mechanics of the Print
At the heart of this technology is industrial piezoelectric print head technology. These advanced print heads use electrical charges to flex a piezoelectric crystal, forcing microscopic droplets of ink through the nozzles and directly into the fibers of the fabric. This allows for incredibly precise ink placement, enabling high resolution CMYK printing on cotton and other natural fibers. The result is a photorealistic print with a soft hand feel that traditional methods struggle to replicate.
The Shift to Print on Demand
The integration of this technology has fueled the print on demand boom. Because there is no extensive setup required for individual designs, businesses can print a single t-shirt profitably. This has opened the floodgates for independent artists, e-commerce brands, and local print shops to offer unlimited color options without holding massive amounts of pre-printed inventory.
2. Analyzing the Business Model: Costs and ROI
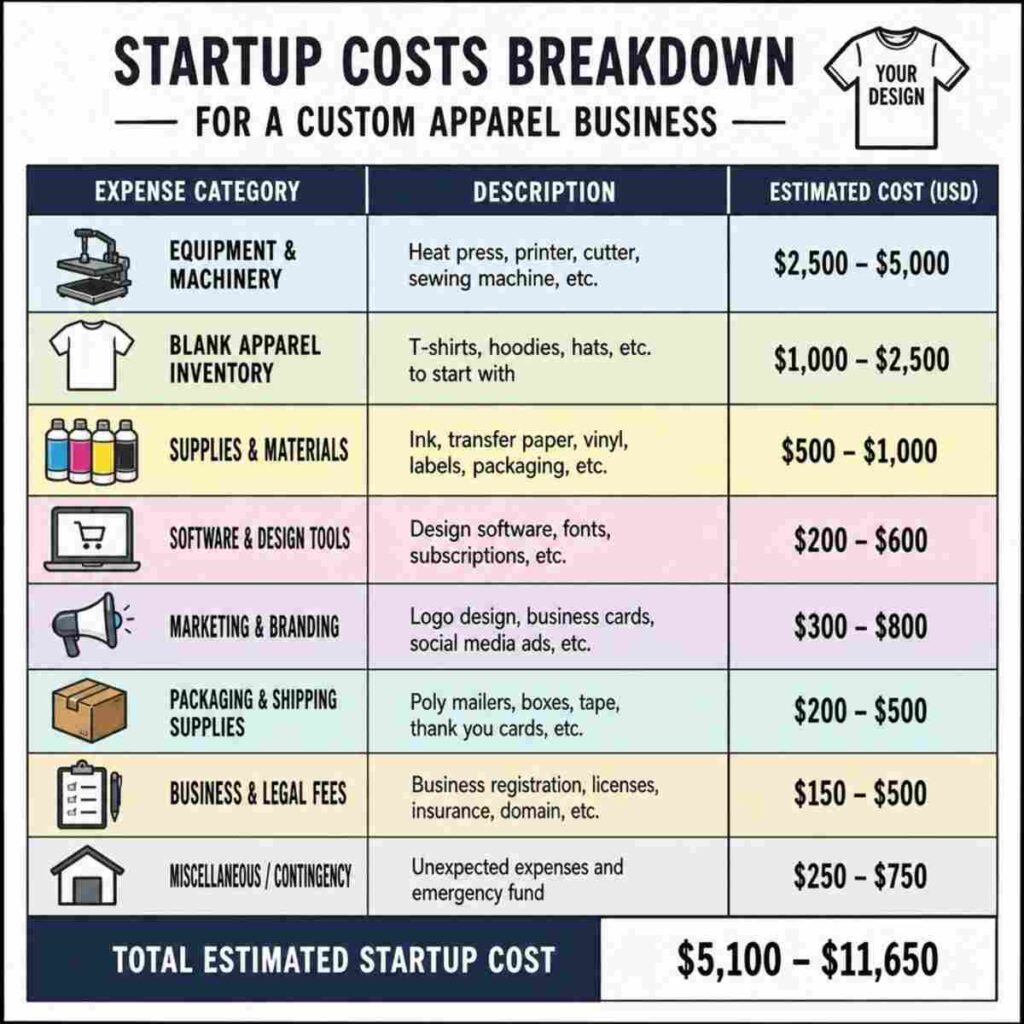
When entering the custom apparel space, financial planning is just as important as mastering the printing technique. Understanding the startup costs for custom apparel business ventures using DTG technology helps set realistic expectations for your return on investment (ROI).
Initial Investment
The startup costs for a professional DTG setup can range from $15,000 for entry-level commercial machines to over $100,000 for high-volume industrial printers. In addition to the printer, you must account for:
- Pretreatment machines: Essential for printing on dark garments.
- Heat presses or conveyor dryers: Necessary for curing the ink and pretreatment.
- RIP (Raster Image Processor) software: Required for translating your digital art into printer commands.
- Inventory and workspace modifications: Climate control is non-negotiable for DTG success.
Digital Shirt Printing vs Screen Printing Costs
A common dilemma for new shop owners is comparing digital shirt printing vs screen printing costs.
- Screen Printing: Requires a high initial setup cost per design (creating screens, mixing ink, aligning the press). However, the cost per shirt drops drastically when printing in bulk (e.g., 500 identical shirts). It is highly cost-effective for large runs but terrible for one-offs.
- DTG Printing: Has a virtually zero setup cost per design. Whether you print one shirt or one hundred, the time and cost to set up the artwork are the same. However, the cost of the consumable ink per shirt is higher than screen printing ink. Therefore, DTG is the undeniable champion for small to medium runs, complex multi-color designs, and personalized items.
3. Selecting the Right Canvas: Fabrics and Blends
A painter is only as good as their canvas, and the same rule applies to digital apparel printing. If you want a vibrant, long-lasting print, you must know which fabrics work best for digital textile printing.
The Gold Standard: 100% Ring-Spun Cotton
DTG water-based inks are formulated to bind with natural fibers. For the absolute best results, 100% ring-spun cotton is the industry favorite. Unlike standard carded open-end cotton (which can have a fuzzy, uneven surface), ring-spun cotton is tightly woven and incredibly smooth. This smooth surface prevents the microscopic ink droplets from misfiring or soaking unevenly, resulting in a crisp, vibrant image.
Blends and Synthetics
While 100% cotton is ideal, modern DTG technology has evolved to handle blends.
- Poly-Cotton Blends (e.g., 50/50 or Tri-blends): These can be printed on, but they often require specialized pretreatment formulas. Because polyester is a synthetic plastic fiber, water-based ink struggles to absorb into it. You may notice a more muted, “vintage” look when printing on tri-blends.
- 100% Polyester: Traditionally, printing on dark 100% polyester with DTG was considered impossible due to dye migration (where the dye of the shirt bleeds into the white ink). While some advanced, expensive chemical processes now allow for this, it is generally recommended to avoid 100% dark polyester for standard DTG operations.
Pro Tip: Always perform wash tests when switching to a new blank garment brand. A shirt that looks identical to your standard stock might have a different chemical sizing or dye process that reacts poorly to your inks.
4. The Magic of Pretreatment
If you are printing on dark garments, or utilizing white ink in any capacity, pretreatment is the most critical step in the entire DTG process. Pretreatment is a liquid primer applied to the shirt before printing.
Why is Pretreatment Necessary?
Water-based white ink contains heavy titanium dioxide pigments. If you spray this ink directly onto a dark cotton shirt, the shirt will simply absorb the ink like a sponge, resulting in a dull, faded, or completely invisible print.
Pretreatment acts as a chemical barrier. When the white ink hits the pretreated surface, a chemical reaction occurs that instantly gels (or coagulates) the ink. This prevents the ink from soaking into the fabric, allowing the white underbase to sit on top of the fibers. The CMYK colors are then printed directly on top of this smooth white surface.
Application Methods
Consistency is the key to pretreatment. Applying too little will result in a dull print; applying too much can leave boxes, stains, or cause the print to flake off after washing.
- Manual Spraying: Using a hand-held HVLP (High Volume Low Pressure) paint sprayer is the cheapest method, but it leaves massive room for human error. It is highly inconsistent and messy.
- Automatic Pretreatment Machines: A dedicated pretreatment machine is a vital investment. You simply load the shirt, press a button, and the machine sprays an exact, measured amount of fluid evenly across the print area.
- Integrated Pretreatment Application Systems: Some of the newest, most advanced Direct to Garment Printers now feature integrated pretreatment application systems. These inline systems spray the pretreatment inside the printer just moments before the ink is laid down. This eliminates an entire manual step from your workflow, dramatically increasing production speed and reducing the footprint of your equipment.
5. Ink Management and Safety
DTG inks are highly specialized chemical formulations. Managing them correctly ensures not only beautiful prints but also a safe product for your customers.
Water-Based Pigment Ink Safety Standards
Consumers are more conscious than ever about the chemicals in their clothing, especially regarding baby and toddler apparel. Fortunately, reputable DTG inks adhere to strict water-based pigment ink safety standards. Look for inks that are OEKO-TEX® ECO PASSPORT certified and CPSIA (Consumer Product Safety Improvement Act) compliant. These certifications guarantee that the inks are free from harmful toxins, heavy metals, and safe for use on infant clothing.
The Challenge of White Ink
White ink is notoriously difficult to manage. Because it is heavily loaded with titanium dioxide to make it opaque, the heavy pigments naturally want to settle at the bottom of the cartridge or ink lines, much like sand in a glass of water.
If the white ink settles, your printer will pull mostly clear carrier fluid, resulting in weak prints. Worse, the settled pigment can clog the microscopic nozzles in the print head. To combat this, modern printers utilize sophisticated white ink agitation and circulation systems.
These systems automatically stir the ink in the main tanks and continuously pump it through the lines and the dampers, even when the printer is idle. This constant movement prevents the titanium dioxide from settling, ensuring that the ink is perfectly mixed and ready to print the moment you receive an order.
6. Color Management and Artwork Preparation
A Direct to Garment Printer can only output what it is given. If your digital artwork is low quality or poorly color-managed, your final print will suffer.
Resolution and Formatting
Always design your artwork at 300 DPI (Dots Per Inch) at the actual print size. Supplying a 72 DPI image pulled from a website and stretching it to fit a 14-inch t-shirt will result in a heavily pixelated, blurry mess. PNG is the standard file format for DTG because it supports transparent backgrounds, which is essential when you want the color of the shirt to show through negative space.
Optimizing Color Profiles for Garment Decoration
Monitors display color using light in the RGB (Red, Green, Blue) spectrum, while DTG printers mix physical ink in the CMYK (Cyan, Magenta, Yellow, Black) spectrum. The RGB color gamut is much larger than the CMYK gamut, meaning there are bright, neon colors you can see on your screen that your printer physically cannot reproduce.
Optimizing color profiles for garment decoration involves using specialized RIP software to translate your RGB design into CMYK ink drops accurately.
- Soft Proofing: Use your graphic design software to “soft proof” the image using a CMYK color profile. This gives you a realistic preview of how the colors will shift when printed.
- Saturation Adjustments: Because ink absorbs into fabric differently than it sits on glossy paper, you may need to artificially boost the contrast and saturation of your digital files before sending them to the RIP software to ensure they pop on the physical garment.
7. Maximizing Production Workflow
As your custom apparel business grows, efficiency becomes your primary focus. Standing in front of a printer waiting for it to finish a long print cycle is dead time.
Utilizing Dual Platen Systems
To scale your operations without immediately buying a second printer, look into dual platen production efficiency. Many mid-to-high-tier DTG printers come equipped with two print platens (the flat boards you dress the shirts onto).
While the printer is actively laying down ink on platen A, the operator can remove the finished shirt from platen B, load a fresh blank, and queue up the next design. When the print head finishes the first shirt, it immediately moves to the second one without skipping a beat. This continuous, staggered workflow minimizes the time the print head sits idle and can effectively double your hourly output.
8. The Critical Curing Process
Printing the ink onto the shirt is not the final step. The ink is wet and must be dried and permanently bonded to the fabric fibers. If this step is done incorrectly, the print will wash out the very first time it hits a laundry machine.
The Step by Step Tshirt Curing Process
Curing DTG ink involves heat, pressure, and time. Most small to medium shops use a professional-grade clam-shell or swing-away heat press.
- Hovering (Optional but recommended): If the shirt is heavy with wet white ink, hovering the hot heat press about an inch above the garment for 10-15 seconds helps evaporate the surface moisture, preventing the wet ink from sticking to your protective sheet.
- Protection: Always cover the wet print with a protective sheet. A Teflon sheet leaves a glossy finish, while parchment paper (silicone-treated) leaves a more desirable, retail-standard matte finish.
- Pressing: Lower the heat press. The exact parameters depend on your specific ink brand, but standard water-based DTG inks generally require a temperature between 320°F to 340°F (160°C to 171°C) with light-to-medium pressure.
- Timing: Dark garments with white underbases usually take longer (typically 90 to 120 seconds). Light garments printed with CMYK only require less time (around 35 to 45 seconds).
- Peeling: Once the timer finishes, open the press smoothly and peel the parchment paper away in one fluid motion to reveal the finished, cured print.
For higher volume shops, forced-air conveyor dryers replace heat presses for curing, allowing you to drop multiple shirts on a belt and let them cure as they pass through a heated tunnel.
9. Equipment Maintenance: Protecting Your Investment
A Direct to Garment Printer is a precision piece of industrial machinery, not a standard office printer. Neglecting maintenance is the fastest way to destroy your investment.
How to Maintain Print Head Longevity
The print head is the most expensive and delicate component of your printer. Learning how to maintain print head longevity is non-negotiable.
- Never Turn It Off: DTG printers are designed to be left on continuously. When in sleep mode, the printer will wake itself up periodically to perform micro-cleans and circulate the white ink. Unplugging the machine over the weekend is a guaranteed way to let the ink dry and ruin the head.
- Climate Control: Water-based inks dry out quickly in low humidity. Your print room must be kept at specific environmental conditions—usually between 45% to 60% relative humidity, and a temperature around 68°F to 78°F. If the air is too dry, the ink will dry inside the nozzles before it ever hits the shirt.
Preventing Nozzle Clogs in Inkjet Textile Printers
Clogged nozzles result in banding (visible lines missing in the print) and incorrect colors. Preventing nozzle clogs in inkjet textile printers requires a strict routine:
- Daily Agitation: Even with automatic circulation, give your white ink cartridges a gentle shake every morning.
- Clean the Capping Station: The capping station is the rubber seal that the print head rests against when not in use. It keeps the head air-tight and moist. If ink builds up on the edges of this cap, it creates an air leak. You must clean the wiper blade and the rim of the capping station daily with a specialized cleaning solution and foam swabs.
- Print a Daily Nozzle Check: Before printing any customer orders, print a nozzle check pattern on a clear piece of film or a scrap shirt. This diagnostic pattern will show you exactly which nozzles are firing and which are clogged, allowing you to perform a head cleaning cycle before ruining a good garment.
10. Troubleshooting Common Issues
Even with the best practices in place, variables in textiles and environment mean you will occasionally run into problems. Here is how to handle the most common issues.
Troubleshooting Ink Wash Fastness Issues
There is nothing worse than a customer complaining that their custom apparel faded after one wash. Troubleshooting ink wash fastness issues usually comes down to three main culprits:
- Under-curing: The heat press wasn’t hot enough, or the timer wasn’t long enough. Ensure your heat press temperature is accurate by testing it with a digital laser pyrometer or heat test strips.
- Poor Pretreatment: If the pretreatment layer is too thin or applied unevenly, the ink won’t bind to the fabric correctly and will wash away.
- Fibrillation: This happens when the actual cotton fibers of the shirt break loose and stand up, pushing through the ink layer. It looks like the ink faded, but it’s actually the un-dyed fibers showing through. Using higher-quality, tightly woven ring-spun cotton and applying enough pressure during the heat press stage flattens these fibers and prevents fibrillation.
Color Shifting and Banding
If your prints look striped or the colors are suddenly wrong (e.g., greens looking blue), you are experiencing banding due to clogged nozzles or ink starvation. Stop printing immediately. Run a nozzle check, perform a cleaning cycle, and ensure your ink lines do not have air bubbles trapped inside them.
11. The Evolving Landscape: DTG vs DTF
As the custom apparel industry innovates, new technologies emerge. Recently, Direct to Film (DTF) printing has become incredibly popular, leading many to ask for a dtg vs direct to film printing comparison.
What is DTF?
Direct to Film printing involves using a specialized inkjet printer to print the design onto a clear PET film. The printer lays down the CMYK colors first, followed by a layer of white ink. A hot-melt adhesive powder is then applied to the wet white ink and melted. The finished film transfer can then be heat-pressed onto a garment.
The Comparison
- Fabric Versatility: DTF shines in its versatility. Because the ink is bonded via an adhesive powder rather than a chemical pretreatment reaction, DTF can be applied to almost any fabric—100% dark polyester, nylon, canvas, and blends—without dye migration issues. DTG is largely restricted to cotton-heavy blends.
- Hand Feel: DTG wins in comfort. A good DTG print on a cotton shirt feels incredibly soft, almost like it is part of the fabric. DTF, because it uses an adhesive powder, sits on top of the fabric and has a slightly plasticky, rubbery feel (similar to a very thin vinyl or traditional screen print transfer).
- Process Efficiency: DTG is generally faster for one-off cotton shirts because you print directly onto the final product. DTF requires a multi-step process (print on film, apply powder, melt powder, press to shirt, peel film).
- Pretreatment: DTF eliminates the need for liquid pretreatment entirely, which removes a major variable and point of failure for many shop owners.
Ultimately, they are complementary technologies. Many successful print shops utilize a Direct to Garment Printer for their premium cotton t-shirt lines, and a DTF system for their polyester athletic wear, hats, and hard-to-print items.
Conclusion
Building a successful custom apparel business using a Direct to Garment Printer is a rewarding endeavor that blends creative design with technical execution. The transition to print on demand has lowered the barrier to entry, but maintaining profitability requires discipline.
By understanding the mechanics of industrial piezoelectric print head technology, carefully selecting the right high-quality cotton fabrics, and mastering the chemistry of pretreatment and water-based inks, you set a solid foundation. Couple this knowledge with rigorous daily maintenance to protect your equipment, and strict adherence to the step-by-step curing process, and you will produce retail-quality garments that rival major brands.
Remember, technology in the digital textile printing world moves rapidly. Stay informed on new advancements like integrated pretreatment application systems and evolving ink safety standards to keep your production efficient, safe, and ahead of the competition. With patience, practice, and a commitment to these best practices, your DTG printing journey will be a vibrant success.