Starting a new medication routine can feel overwhelming, especially when it involves needles. If your healthcare provider has recently prescribed a GLP-1 medication, you might be feeling a mix of hope and hesitation. Whether you are using Ozempic for diabetes management or for other prescribed health benefits, learning the proper techniques for self-administration is the key to a stress-free and effective treatment journey. Read the Best info about injecting ozempic.
Injecting Ozempic at home does not have to be a source of anxiety. With the right knowledge, preparation, and a few expert tips, the process becomes a seamless part of your weekly routine. This comprehensive guide will walk you through everything from the initial preparation to the disposal of your supplies, ensuring you feel confident, safe, and fully in control of your health.
Understanding Your Medication
Before diving into the physical steps of injecting Ozempic, it is helpful to understand exactly what you are administering and why the injection process is designed the way it is.
What is Ozempic?
Ozempic (semaglutide) belongs to a class of medications known as GLP-1 receptor agonists. It mimics a naturally occurring hormone in your body called glucagon-like peptide-1, which targets brain regions that regulate appetite and food intake. When using Ozempic for diabetes, this mechanism is crucial because it also stimulates insulin secretion and lowers glucagon secretion when blood sugar levels are high.
Because semaglutide is a peptide—a small protein—it cannot be taken in pill form for this specific formulation (unlike its sister drug, Rybelsus). Stomach acids would break it down before it could enter your bloodstream. Therefore, it must be delivered into the fatty tissue just beneath the skin.
Overcoming Needle Anxiety
If the thought of injecting Ozempic makes you nervous, you are not alone. Needle phobia is incredibly common. However, the technology behind modern injection pens has advanced significantly. The needles used for these pens are extraordinarily thin—often compared to the thickness of a couple of human hairs. Most patients report that the anticipation is far worse than the actual injection, which is often completely painless.
Preparing for Your Injection
Proper preparation sets the stage for a smooth, safe injection. Rushing the process is where mistakes happen. Set aside ten minutes in a quiet, well-lit room for your first few doses until the routine becomes second nature.
Gathering Your Supplies
Before you uncap your pen, make sure you have everything you need within arm’s reach. You will need:
- Your prescribed Ozempic pen.
- A new, sterile needle (such as a Novofine 32G needle for the Ozempic pen).
- An alcohol swab or a cotton ball with rubbing alcohol.
- An FDA-cleared sharps disposal container.
- A clean tissue or sterile gauze pad.
Reading the GLP-1 Receptor Agonist Pen Instructions
Every medication box comes with a detailed insert. While this article provides a comprehensive overview, you should always review the manufacturer’s instructions for the GLP-1 receptor agonist pen. These inserts contain specific, up-to-date guidance on your specific pen type, as dosing dials and pen colors can vary depending on your prescribed dose.
The Importance of Hand Hygiene
Never skip washing your hands. Use warm water and antibacterial soap, scrubbing for at least 20 seconds. Dry your hands thoroughly with a clean towel. This simple step is your primary defense against introducing bacteria into the injection site.
The Ozempic Pen Priming Process
If you are opening a brand-new pen for the first time, you must prepare the pen to ensure the medication flows correctly and to remove any tiny air bubbles that may have formed during manufacturing or shipping. This is known as the Ozempic pen priming process, sometimes referred to as the “flow check.”
Note: You only need to prime a pen before its very first use. Do not prime the pen before every single injection, or you will waste your medication.
How to Prime Your Pen:
- Attach the Needle: Tear off the paper tab from a new needle. Push the needle straight onto the pen and twist until it is tight. Pull off the outer needle cap and keep it. Pull off the inner needle cap and throw it away.
- Turn the Dose Selector: Turn the dial until the flow check symbol (a small drop icon or two dashes) lines up with the dose pointer.
- Hold the Pen Upward: Point the needle toward the ceiling. Tap the top of the pen gently a few times to let any air bubbles rise to the top.
- Press the Button: Press and hold the dose button until the dose counter returns to “0”.
- Check for Medication: A drop of medication should appear at the needle tip. If a drop does not appear, repeat the process up to 6 times. If still no drop appears, change the needle and try once more. Do not use the pen if no drop still emerges.
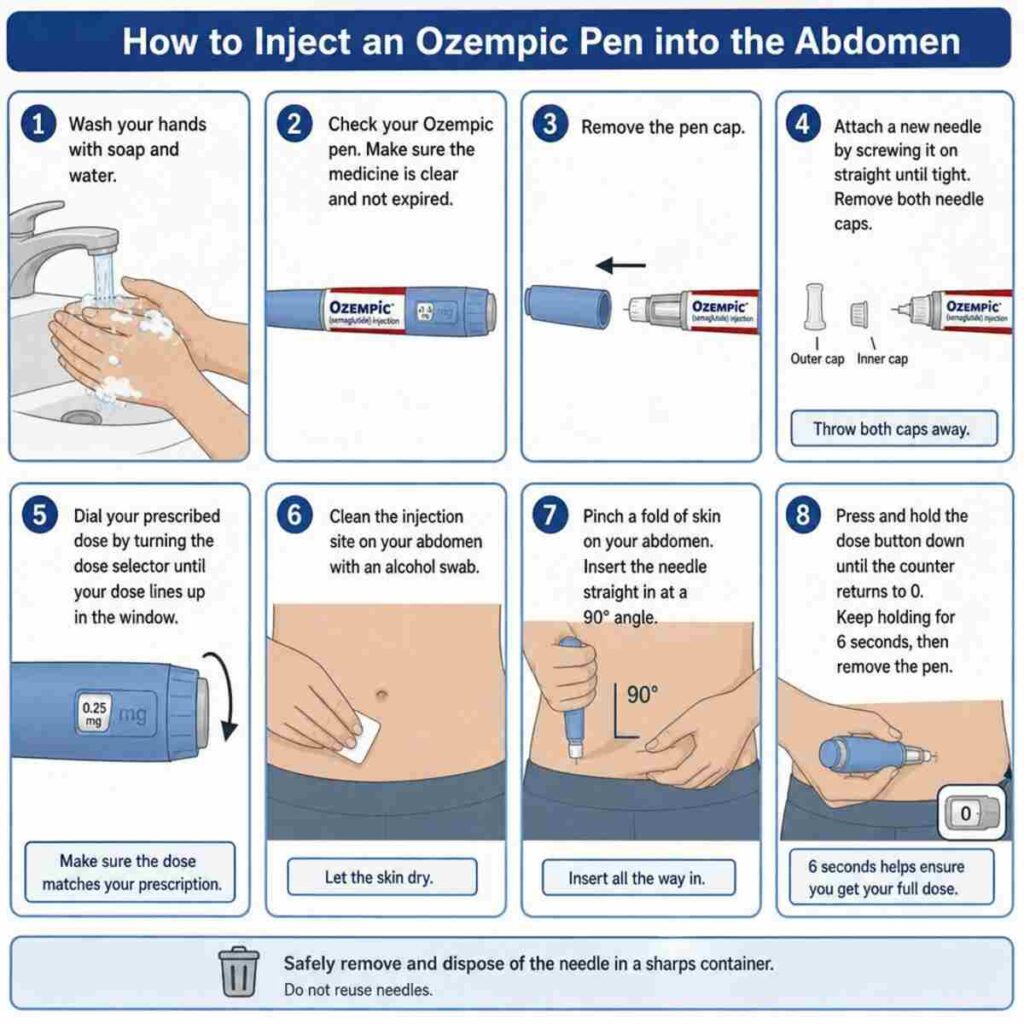
How to Inject Ozempic: Step-by-Step Guide
Once your pen is primed (if it’s new) and your supplies are ready, you can move on to the actual administration. Following the correct semaglutide subcutaneous administration steps ensures that the medication is absorbed correctly by your body.
Step 1: Select and Prepare Your Dose
Turn the dose selector until your prescribed dose lines up with the dose pointer. The pen will click as you turn it. If you turn past your dose, you can simply turn the dial backward until the correct dose lines up.
A quick note on click counting: Some patients, under the strict guidance of their doctor, may need to count clicks to achieve a specific micro-dose, though this is not standard practice. For instance, patients frequently ask how many clicks for Ozempic 0.5 mg dose. On standard Ozempic pens designed for the 0.25/0.5mg doses, 0.5 mg is usually reached by turning the dial to the clearly marked “0.5” line (often around 37 clicks, though you should rely on the printed number on the dial rather than counting, to avoid dangerous dosing errors).
Step 2: Choose Your Injection Site
Wipe your chosen injection site with an alcohol swab and let it air dry completely. Do not fan it or blow on it, as this can introduce bacteria from your breath.
Step 3: Insert the Needle
Hold the pen like a dart, with your thumb hovering over the dose button. Ensure you can see the dose counter. Pinch a fold of skin at the injection site (this ensures you hit the subcutaneous fat layer and not the muscle). Insert the needle straight into your skin at a 90-degree angle.
Step 4: Inject the Medication
Press and hold the dose button down firmly until the dose counter shows “0”. You may hear or feel a final click.
Step 5: The 6-Second Hold
This is a critical step. Once the counter reaches “0”, do not remove the needle immediately. Keep the needle in your skin and count slowly to 6. This allows the full dose of the medication to be delivered and prevents leakage from the injection site.
Step 6: Remove and Dispose
Pull the needle straight out of your skin. If a tiny drop of blood appears, lightly press a tissue or gauze against the spot (do not rub). Carefully place the outer needle cap back onto the needle, unscrew it from the pen, and dispose of it safely.
Choosing the Right Injection Site
Where you inject matters. GLP-1 medications are designed for subcutaneous injection, meaning they must go into the fatty tissue layer just below the skin.
Best Body Areas for GLP-1 Injections
There are three primary areas recommended for injecting Ozempic:
- The Abdomen: This is the most common and often the easiest site for self-administration. You can inject anywhere on the front of your abdomen, keeping a strict distance of at least 2 inches away from your belly button. Avoid scars, stretch marks, and bruises.
- The Thighs: The front of the thighs (the top, fleshy part) is an excellent alternative. It is easy to reach and offers a good layer of subcutaneous fat for most people.
- The Upper Arms: The back of the upper arms is the third option. This area can be slightly more awkward to reach on your own, so you may need a partner or a mirror to assist you if you choose this site.
The Importance of Site Rotation
One of the most vital rules of long-term injectable medications is rotating your injection sites to prevent lipohypertrophy.
Lipohypertrophy is a medical term for the accumulation of extra fat and scar tissue under the skin, caused by repeated injections into the exact same spot. Over time, these areas can become hard, lumpy, and rubbery.
Why is this dangerous? If you inject Ozempic into an area with lipohypertrophy, the scar tissue can severely delay or alter the absorption of the medication. This means your body might not get the correct dose, leading to uncontrolled blood sugar levels or diminished appetite suppression.
How to rotate effectively:
- Change areas: If you used your left thigh last week, use your right thigh this week.
- Micro-rotation: If you prefer to stick to your abdomen, imagine your stomach as a clock face centred on your belly button. Inject at 12 o’clock this week, 3 o’clock next week, 6 o’clock the following week, and so on. Always ensure you are at least one inch away from your previous injection spot.
Navigating the Dosing Schedule
Ozempic is not a medication you start at the maximum dose. Your body needs time to acclimate to the hormone to minimize gastrointestinal side effects.
The Ozempic Titration Schedule for Beginners
Your healthcare provider will prescribe a specific escalation plan, but the standard Ozempic titration schedule for beginners generally looks like this:
- Weeks 1 through 4: 0.25 mg once weekly. (This is an initiation dose. It is not intended for glycemic control or weight management, but strictly to get your body used to the drug.
- Weeks 5 through 8: 0.5 mg once weekly.
- Weeks 9 and beyond: Depending on your body’s response, your doctor may maintain you at 0.5 mg or increase your dose to 1.0 mg or 2.0 mg once weekly.
Always follow your doctor’s specific instructions. Do not rush the titration schedule in hopes of faster results; doing so almost guarantees severe nausea and vomiting.
Making the Injection Process Painless
While the Novofine 32G needles for Ozempic pen are incredibly thin, the sensation of an injection can still be slightly uncomfortable for some. Here are several expert tips for reducing discomfort during Ozempic administration:
- Let the Alcohol Dry: If you inject while the rubbing alcohol on your skin is still wet, it will sting as the needle pushes the alcohol into the micro-puncture. Wait 30 seconds for it to evaporate completely.
- Room Temperature Medication: Injecting cold medication directly from the refrigerator can cause a slight stinging sensation. (We will cover storage rules shortly, but a pen currently in use can be kept at room temperature.
- Relax Your Muscles: Tensing up makes injections hurt more. If you are injecting into your thigh, sit down and let your leg go completely limp. Take a deep breath in, and insert the needle as you slowly exhale.
- Avoid Hair Follicles: The root of a hair follicle has more nerve endings. Try to choose a tiny patch of clear skin for the needle insertion.
- Use a Swift Motion: Do not push the needle in slowly. A quick, dart-like insertion is far less painful.
Safe Storage and Lifespan of Your Pen
Proper storage is non-negotiable for peptide medications. Heat, freezing temperatures, and direct sunlight can denature the proteins, rendering the medication useless.
Before First Use
Unopened Ozempic pens must be stored in the refrigerator between 36°F and 46°F (2°C and 8°C). Keep them away from the cooling element in the back of the fridge so they do not accidentally freeze. If Ozempic freezes, you must throw it away, even if it thaws.
After First Use (Opening the Pen)
Once you have used your pen for the first time, you have options. You can continue to keep it in the refrigerator, or you can begin storing semaglutide pens at room temperature (between 59°F and 86°F or 15°C and 30°C).
Many patients prefer room-temperature storage because, as mentioned earlier, it makes injections more comfortable. Keep the pen cap on when not in use to protect the medication from light.
Ozempic Pen Expiration After Opening
Time is of the essence once a pen is punctured. The Ozempic pen’s shelf life after opening is exactly 56 days (8 weeks).
After 56 days, the pen must be discarded, even if there is still medication left inside. The preservative efficacy begins to wane, and the structural integrity of the semaglutide cannot be guaranteed. A helpful tip is to write the date you opened the pen on the cardboard box or directly on the pen label with a fine-tip permanent marker.
Troubleshooting Common Scenarios
Life happens, and sometimes your injection routine will not go exactly as planned. Knowing how to handle these hiccups will give you peace of mind.
How to Manage a Missed Semaglutide Dose
Because Ozempic is a once-weekly injection, forgetting a dose is common. Here is the standard protocol for how to manage a missed semaglutide dose:
- If it has been 5 days or less since your missed dose: Take the injection as soon as you remember. Then, continue with your regular weekly schedule.
- If it has been more than 5 days since your missed dose: Skip the missed dose entirely. Wait and take your next dose on your regularly scheduled day.
Never inject a double dose to make up for a missed one. This will cause a rapid spike in the medication levels in your system, likely leading to intense gastrointestinal distress and a risk of hypoglycemia (low blood sugar).
Dealing with Travel
Traveling with Ozempic requires a bit of planning. If you are flying, always keep your pens in your carry-on luggage. The cargo hold of an airplane can experience extreme temperature fluctuations, including freezing temperatures, which will destroy the medication.
If you are traveling with unopened pens, you will need an insulated medical travel case with an ice pack to maintain the required 36°F to 46°F temperature. Be sure the ice pack does not come into direct contact with the pen to prevent freezing. TSA officers are familiar with injectable medications, but it is always recommended to carry your prescription label.
After the Injection: Care and Disposal
The injection might be over, but the process isn’t entirely finished until you’ve safely cleaned up and monitored your body’s response.
Proper Disposal of Used Needles in Sharps Container
Never, under any circumstances, throw a used needle into your regular household trash or recycling bin. This poses a severe danger to sanitation workers, pets, and other household members.
You must properly dispose of used needles in a sharps container. An FDA-cleared sharps container is made of rigid, puncture-resistant plastic with a secure lid.
If you do not have a dedicated sharps container, many local health departments allow the use of a heavy-duty plastic household container, such as an empty laundry detergent bottle. If you use this method:
- Ensure the bottle is clean and dry.
- Place needles inside immediately after use.
- When the bottle is three-quarters full, screw the cap on tightly and secure it with heavy-duty tape (like duct tape).
- Write “DO NOT RECYCLE – SHARPS” clearly on the outside.
- Check your local community guidelines for how to dispose of this container, as laws vary by state and municipality. Some pharmacies and hospitals offer sharps drop-off programs.
Side Effects to Monitor After First Ozempic Dose
As your body adjusts to the influx of GLP-1 receptor agonists, you may experience some side effects. Being prepared for these will help you manage them effectively.
The most common side effects to monitor after the first Ozempic dose include:
- Nausea: This is the most widely reported side effect. It is usually mild to moderate and peaks a day or two after the injection.
- Diarrhea or Constipation: GLP-1 medications slow down gastric emptying (how fast food leaves your stomach). This can alter your bowel movements.
- Fatigue: Feeling slightly more tired than usual is common in the first few days.
- Stomach Pain or Indigestion: Mild bloating or acid reflux can occur.
When to contact a doctor: While mild gastrointestinal distress is normal, severe symptoms are not. Contact your healthcare provider immediately if you experience:
- Severe, relentless abdominal pain (which could radiate to your back), with or without vomiting. This can be a sign of pancreatitis, a rare but serious complication.
- Changes in vision (especially if you have diabetic retinopathy).
- Signs of an allergic reaction, such as swelling of your face, lips, or throat, or severe difficulty breathing.
- A lump or swelling in your neck, hoarseness, or trouble swallowing. (Ozempic carries a black box warning regarding a potential risk for thyroid C-cell tumours based on animal studies.
Managing Nausea Successfully
If you do experience nausea after injecting Ozempic, there are several dietary and lifestyle adjustments you can make to mitigate the discomfort:
- Eat smaller, more frequent meals: Overeating is a primary trigger for GLP-1-induced nausea.
- Avoid high-fat and greasy foods: Fast food and heavy meals are harder to digest, which can compound the medication’s delayed gastric emptying effect.
- Stay hydrated: Drink plenty of ice-cold water, taking small sips throughout the day.
- Bland foods: If nausea strikes, stick to the BRAT diet (Bananas, Rice, Applesauce, Toast) or saltine crackers until your stomach settles.
Comparing GLP-1 Medications
As the landscape of metabolic and diabetes treatments expands, patients often find themselves curious about other medications on the market. A common point of confusion is how Ozempic compares to newer drugs like Mounjaro (tirzepatide).
Ozempic vs Mounjaro Administration Differences
While both are incredibly effective injectables, there are distinct differences in Ozempic vs Mounjaro administration that patients should be aware of, especially if they are transitioning from one to the other.
- The Pen Design:
- Ozempic: Uses a multi-dose pen. You manually attach a new needle each week, dial the dose yourself, and can visually see the needle as you inject. One pen lasts for a month (4 weeks).
- Mounjaro: Uses a single-dose, auto-injector pen. The needle is hidden inside the device. You simply unlock the pen, place it flat against your skin, and press a button at the top. The pen automatically inserts the needle, delivers the dose, and retracts the needle. You dispose of the entire pen after one use.
- Mechanisms of Action: Ozempic is a single GLP-1 receptor agonist. Mounjaro is a dual-agonist, targeting both GLP-1 and GIP (glucose-dependent insulinotropic polypeptide) receptors, which some studies suggest provides more robust blood sugar control and weight loss.
- Dosing Adjustments: With Ozempic, because you control the dial, doctors occasionally have patients adjust clicks for custom dosing (though this is off-label). With Mounjaro’s auto-injector, you receive a fixed dose, and the entire pen must be used at once; you cannot give yourself a “half dose” from a Mounjaro pen.
The Psychological Aspect of Weekly Injections
Injecting a medication long-term requires mental stamina. It is completely normal to experience “injection fatigue,” a phenomenon where patients become tired or resentful of their weekly routine.
To combat this, try linking your injection to a positive habit (habit stacking). For example, take your injection on Sunday mornings, immediately followed by watching your favorite TV show with a cup of herbal tea. Rewarding yourself helps reprogram your brain to view the injection not as a chore, but as a small, momentary step toward a much larger goal of long-term wellness.
Remember that injecting Ozempic is a profound act of self-care. Every click of that pen is a step toward better blood sugar management, cardiovascular health, and a healthier future.
Integrating Lifestyle Changes
Ozempic is not a magic wand; it is a powerful tool. When using Ozempic for diabetes or metabolic health, the injections must be paired with healthy lifestyle modifications for optimal results.
- Nutrition: Focus on lean proteins, abundant vegetables, and complex carbohydrates. Because Ozempic reduces appetite, the food you do eat must be nutrient-dense to prevent malnutrition and muscle loss.
- Strength Training: Weight loss associated with GLP-1s can include the loss of lean muscle mass. Incorporating resistance training (like lifting weights or bodyweight exercises) 2-3 times a week helps preserve your muscle mass and keep your metabolism strong.
- Consistent Sleep: Poor sleep spikes cortisol and insulin resistance, making it harder for the medication to work. Aim for 7-9 hours of quality sleep per night.
Frequently Asked Questions (FAQs)
To further demystify the process of injecting Ozempic, let’s address some of the most common questions patients ask their endocrinologists and pharmacists.
Q: Do I need to clean the pen itself with alcohol? A: No, you should not wipe the body of the pen with alcohol, as this can wear away the numbers on the dose dial. You only need to wipe the rubber seal where the needle attaches if it appears soiled, though generally, just using a fresh needle each time is sufficient for pen hygiene. Always keep the pen cap on to keep dust out.
Q: Can I share my Ozempic pen with a family member if we change the needles? A: Absolutely not. You must never share an injection pen with another person, even if you change the needle. There is a risk of biological backflow into the pen cartridge, which can transmit serious bloodborne pathogens like Hepatitis or HIV. Your pen is prescribed strictly for your personal use.
Q: What if I see an air bubble in the cartridge? A: Small air bubbles are completely normal and harmless. Because you are injecting into subcutaneous fat rather than a vein, a tiny air bubble will not cause a medical emergency (such as an embolism). After priming the Ozempic pen, a new pen will remove significant air pockets.
Q: Why does it sometimes leak a drop of medicine after I take the needle out? A: This usually happens if you remove the needle too quickly. Ensure you are practicing the strict 6-second hold after the counter returns to zero. If you do see a tiny droplet on your skin after removing the needle, do not panic; it is a negligible amount of medication and will not affect the overall efficacy of your dose. Do not attempt to inject more to compensate.
Q: Can I inject through my clothing? A: No. Unlike some emergency auto-injectors (like EpiPens) designed to penetrate denim in a crisis, GLP-1 pens require direct skin contact. Injecting through clothing can blunt the fine Novofine 32G needle, introduce fabric fibers into your skin, and prevent you from visually confirming that the medication was delivered properly.
Q: I have a lot of stretch marks on my stomach. Is it safe to inject there? A: Try to avoid injecting directly into stretch marks or scars. Scar tissue has a different density and less blood flow than normal subcutaneous fat, which can interfere with how the semaglutide is absorbed into your system. Choose a patch of smooth, unblemished skin nearby instead.
Conclusion: Empowering Your Health Journey
Mastering how to inject Ozempic is a significant milestone in taking control of your health. While the process may seem daunting at first glance, the modern design of GLP-1 pens and ultra-thin needles makes it highly manageable.
By prioritizing preparation, choosing the best body areas for GLP-1 injections, rigorously rotating injection sites to prevent lipohypertrophy, and understanding your storage and expiration rules, you are setting yourself up for success. Remember to be patient with your body as it adapts to the Ozempic titration schedule for beginners, and always maintain open communication with your healthcare provider regarding any side effects or dosing questions.
Your weekly injection is more than just a medical requirement; it is a dedicated moment when you actively invest in your longevity, metabolic health, and overall well-being. Take a deep breath, trust the process, and know that you have all the knowledge you need to administer your medication safely and confidently.
Disclaimer: This article is for informational purposes only and does not constitute medical advice. Always consult with your prescribing physician or a certified diabetes care and education specialist regarding your specific medication regimen, dosing, and injection techniques.